Blog 2 – Rejuvenation of a Yahboom Jetbot
February 4, 2026
The Jetbot
The Jetbot AI Robot was introduced around 2019 by the Shenzhen Yahboom Technology Co., Ltd. I purchased the Jetbot in 2020. It represented one of the early AI capable robots, an application of the Jetson Nano and the use of serial bus servos in a machine of this type. After the kit was built the Jetbot worked as advertised (JetBot AI Robot Car).
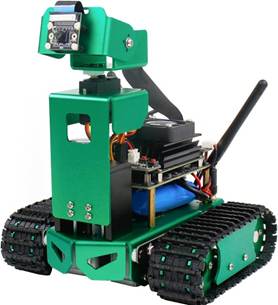
Figure 1 – Jetbot
After initial evaluation little was done with the Jetbot until mid-2024 when I wanted to use it for a robot demonstration. I found that the software would not start and it was put back on the shelf. Recently I decided to bring the Jetbot back to life as it is a good representation of the early advance of hobby/education robots to using computers such as the Jetson Nano.
The Jetbot WEB site includes the software image that I assume was on the factory provided USB disk (which no longer worked). A 128 Gb micro SD card was imaged with balenaEtcher. The image software still would not start. Troubleshooting the factory image/software didn’t seem very productive. Further, I was interested primarily in getting a function demonstration working and at least one example of a machine learning function so did not need all the functions of the original working Jetbot. Even with the decision to do a subset of the factory provided functionality, the development of the scripts needed was a challenge in reverse engineering.
To begin the rejuvenation process I went to the Anthropic Large Language Model Sonnet 4.5 or ‘Claude’ and began a step by step process of developing the Python scripts needed to make the Jetbot functional. The Jetbot Nano shipped with Ubuntu 18.04 and Nvidia JetPack 4.x. It did not use the Robot Operating System (ROS). Rather than trying to replicate the factory software Claude found an updated image that uses Ubuntu 20.04 (Qengineering/Jetson-Nano-Ubuntu-20-image; GitHub – Qengineering/Jetson-Nano-Ubuntu-20-image: Jetson Nano with Ubuntu 20.04 image). This image was downloaded and written to a 128 Gb microSD (Jetson-Nano-Ubuntu-20-image-main.zip). The SD was installed and the Jetson Nano opened Ubuntu 20.04. Through the next several days working with commands and Python3 script provided by Claude, the functionality of Table 1 was developed.
Jetbot Functions
Component Status
Drive motors ✓ Working
Camera lift + limits ✓ Working
RGB LEDs ✓ Working
OLED display ✓ Working
USB camera streaming ✓ Working
PWM servos (pan/tilt) ✓ Working
Logitech controller ✓ Working
K1 shutdown button ✓ Working
Ball tracking ✓ Working
Battery monitor ✓ Working (Bus 0, 0x41)
Auto-start service ✓ Working
Table 1 – Jetbot Functions Implemented
The development process was not without some challenges as discussed in the next sections.
Jetbot Hardware
The Jetbot hardware includes: 1) Nvidia Jetson Nano, 2) Yahboom Jetson Expansion Board, 3) bus connected camera, 4) horizontal and vertical serial bus servos for camera control, 5) DC motor to raise and lower the camera mount, 6) two worm gear track motors (without encoders). Over the course of the rejuvenation work several changes to the hardware were made:
- While getting the horizontal and vertical serial bus servos to work the bus driver electronics failed. I suspect a some point while disconnecting/connecting the servo there was a static discharge. The period of work was during an extended cool spell and the inside humidity was really low. The expansion board for the Jetbot is no longer available so another camera servo solution was needed. PWM connections are available on the expansion board but I couldn’t find any servos of the right size to replace the original ones so replaced the entire camera assembly with one I had which used a USB camera and PWM servos.
- I added an INA219 current/voltage monitor for the battery and the script for a robot shutdown if the battery voltage gets too low (more later). This was not a part of the factory configuration. I must admit my addition is not in keeping with the construction quality of the original product.
- The picture below shows the camera and voltage monitoring changes.
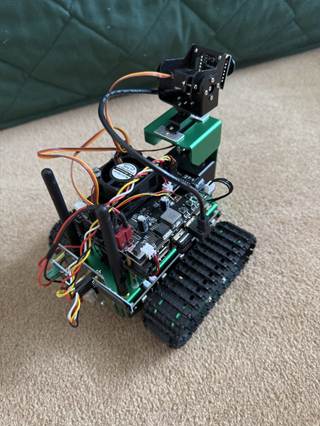
Figure 2 – Jetbot with replacement camera assembly and INA219 assembly (at rear)
In addition to the Jetbot hardware, remote control was done using a Logitech Wireless Gamepad F710 in place of the controller provided with the product.
Software Development
Software development do using ‘Claude’ in an interactive relationship. This and other work have used Claude for commands, coding and suggested directions.
Yahboom provides for download documentation and much of the code used in the Jetbot product. The following is the list of the download section (JetBot AI Robot Car)
- APP(iOS/Android)
- System image(U disk)
- VM Ware
- Code
- Annex
- Instruction Manual
- Hardware Manual
- eMMC boot file
- servoserial.py
Downloaded scripts were provided to Claude as reference to create new Python script specifically for this Jetbot operation plan. In the text and graphics which follow the software configuration of the Jetbot rejuvenation process are described. The content was generated per prompts by Claude. It is important to add that this was not a straight line process as there were a number of places where some trial and error was required to get the desired results. It is also an example of the power of the LLM project process. While I do and have done programmed and system design, what I might do in hours, Claude does in seconds. The summary which follows is an example. In about 10 minutes I have a description of the entire project.
Project Summary (generated by Claude)
Overview
jetbot_tracker.py is a comprehensive control script for the Yahboom JetBot that provides manual remote control via a Logitech F710 gamepad, autonomous colored ball tracking and following, HTTP camera streaming, battery monitoring with auto-shutdown protection, and safe shutdown via a hardware button.
This project arose from the need to completely rebuild the JetBot’s software stack after the manufacturer’s supplied SD card image failed to boot. Starting from a clean Qengineering Ubuntu 20.04 image for the Jetson Nano, every hardware interface was reverse-engineered and rebuilt from scratch using Python, OpenCV, and direct I2C communication with the expansion board’s PCA9685 PWM controller.
Hardware Components
The JetBot’s hardware is controlled through a combination of I2C buses, GPIO pins, and USB interfaces. The central PCA9685 PWM controller at address 0x40 drives all motors and servos.
| Component | Interface | Address / Pin |
| Drive Motors (Left/Right) | PCA9685 PWM | 0x40, Channels 8–11 |
| Camera Lift Motor | PCA9685 PWM | 0x40, Channels 12–13 |
| Lift Limit Switches | GPIO | Pin 11 (up), Pin 12 (down) |
| Pan/Tilt Servos | PCA9685 PWM (50 Hz) | 0x40, Channels 0–1 |
| RGB LED Strip | I2C | 0x1B |
| OLED Display (128×32) | I2C Bus 0 | 0x3C |
| Battery Monitor (INA219) | I2C Bus 0 | 0x41 |
| Shutdown Button (K1) | GPIO | Pin 24 (active LOW) |
| USB Camera | V4L2 | /dev/video1 |
Software Architecture — Class Descriptions
BatteryMonitor
Reads voltage from an INA219 current/voltage sensor connected to I2C Bus 0 at address 0x41. The sensor monitors the 3S Li-ion battery pack and enables automatic shutdown when voltage drops below safe levels.
| Method | Description |
| __init__(address, bus) | Initialize I2C connection to INA219 sensor |
| read_voltage() | Returns battery voltage as float, or None if sensor unavailable |
Battery Voltage Thresholds
| Voltage | Status | Action |
| 12.6 V | Full charge | — |
| 11.7 V | ≈75% | Normal operation |
| 11.1 V | ≈50% | Normal operation |
| 10.0 V | Low | Warning — orange LED pulse |
| 9.0 V | Critical | Auto-shutdown initiated |
OLED
Controls a 128×32 monochrome OLED display via I2C Bus 0 at address 0x3C. Displays system status, IP address, battery voltage, and tracking information.
| Method | Description |
| show_status(ip, msg, voltage) | Display IP address, status message, and battery voltage |
| show_tracking(color, status, radius) | Display active tracking mode, status, and ball radius |
| show_shutdown(countdown) | Display shutdown countdown timer |
Motors
Controls the differential drive system via PCA9685 PWM channels. Each motor uses two channels (forward and reverse) for bidirectional control.
| Method | Description |
| set_motors(left, right) | Set motor speeds from −1.0 (full reverse) to +1.0 (full forward) |
| stop() | Stop both motors immediately |
Motor Channel Mapping
| LEFT_FWD = Channel 11 RIGHT_FWD = Channel 8 LEFT_REV = Channel 10 RIGHT_REV = Channel 9 |
Lift
Controls the camera lift mechanism, which raises and lowers the camera platform. Uses two PCA9685 channels (12 and 13) and monitors GPIO limit switches to prevent over-travel in either direction.
| Method | Description |
| move(speed) | Move lift from −1.0 (down) to +1.0 (up); respects limit switches |
| stop() | Stop lift motor |
| check_limits() | Returns tuple (at_top, at_bottom) indicating limit switch state |
PWMServos
Controls pan and tilt camera servos via PCA9685 at 50 Hz. Servo positions are specified in microseconds of pulse width.
| Method | Description |
| move_vertical(delta) | Adjust tilt by delta microseconds |
| move_horizontal(delta) | Adjust pan by delta microseconds |
| center() | Move both servos to center position |
| tracking_start_position() | Camera angled down and centered for ball tracking |
| cleanup() | Release servo resources |
Servo Configuration
| Vertical (Ch 0): 1000μs = up, 1800μs = down, center = 1400μs Horizontal (Ch 1): 1000μs = right, 2000μs = left, center = 1500μs |
RGB
Controls an RGB LED strip via I2C at address 0x1B. Provides visual feedback for operating mode, tracking status, and battery warnings.
| Method | Description |
| set_all(r, g, b) | Set all LEDs to specified color (0–255 per channel) |
| off() | Turn off all LEDs |
| flash_red(duration) | Flash red LEDs for specified duration (limit switch warning) |
| pulse_orange() | Pulsing orange pattern (low battery warning) |
CameraWithTracking
Wraps OpenCV VideoCapture with MJPEG streaming and color detection. Captures frames from a USB camera at 640×480, applies HSV color filtering to detect colored balls, and serves frames as an HTTP MJPEG stream on port 8080.
| Method | Description |
| get_frame() | Returns current frame as JPEG bytes |
| detect_ball(color) | Returns (x, y, radius) of detected ball or None |
| stop() | Release camera resources |
Color Detection Ranges (HSV)
| RED: H: 0–10 or 170–180, S: 100–255, V: 100–255 GREEN: H: 40–80, S: 50–255, V: 50–255 BLUE: H: 100–130, S: 50–255, V: 50–255 |
Joystick
Reads input from a Logitech F710 gamepad connected via USB wireless dongle. Reads raw joystick events from /dev/input/js0 in a background thread.
| Method | Description |
| read() | Returns current state of all axes and buttons |
| cleanup() | Close device file |
BallTracker
Implements the autonomous ball tracking state machine. Coordinates motors, servos, camera, and LEDs to search for, track, and follow colored balls.
| Method | Description |
| start(color) | Begin tracking a specific color (red, green, or blue) |
| stop() | Exit tracking mode and return to manual control |
| update() | Called each loop iteration; runs search/track/follow logic |
Operating Modes and Control Flow
Main Loop
The main loop runs at approximately 50 Hz (20 ms sleep). Each iteration checks the hardware shutdown button, reads battery voltage, processes joystick input, and either runs the ball tracker or processes manual control commands.
| ┌─────────────── STARTUP ───────────────┐ │ Initialize: GPIO, OLED, Motors, │ │ Lift, Servos, RGB, Battery, │ │ Joystick, Camera, HTTP Server │ └───────────────────┬───────────────────┘ │ ┌───────▼────────┐ │ MAIN LOOP │ │ 1. Check K1 │ │ 2. Read battery │ │ 3. Read joystick │ │ 4. Update mode │ │ 5. Sleep 20ms │ └───────┬────────┘ │ ┌──────────┼──────────┐ ▼ ▼ ▼ SHUTDOWN MANUAL TRACKING (K1 held (Joystick (Autonomous or low control) ball follow) battery) |
Controller Mapping
The Logitech F710 gamepad controls all manual robot functions. The controller operates in DirectInput mode.
| Input | Action |
| Right Stick Y-Axis | Drive forward / reverse |
| Right Stick X-Axis | Steer left / right |
| Left Stick X-Axis | Pan camera horizontally |
| Left Stick Y-Axis | Tilt camera vertically |
| RT (Right Trigger) | Raise camera lift |
| LT (Left Trigger) | Lower camera lift |
| A Button | Green LEDs |
| B Button | Red LEDs |
| X Button | Blue LEDs |
| Y Button | LEDs off |
| D-pad Left | Track BLUE ball |
| D-pad Up | Track GREEN ball |
| D-pad Right | Track RED ball |
| RB (Right Bumper) | Exit tracking mode |
Ball Tracking Algorithm
Search Phase
When ball tracking is activated by pressing a D-pad arrow, the camera moves to its start position (angled down and centered). The RGB LEDs are set to the target color as a visual indicator. The robot then rotates in place at a slow search speed while the camera scans each frame for a matching colored circle using HSV color filtering and contour detection.
Track Phase
Once a ball is detected, the tracker enters the active tracking phase with three prioritized control axes:
| 1. HORIZONTAL CENTERING (highest priority) – Error = ball_x – frame_center_x – If |error| > CENTER_TOLERANCE: rotate robot – Speed proportional to error 2. VERTICAL CENTERING – Error = ball_y – frame_center_y – Tilt camera servo to compensate 3. DISTANCE CONTROL (only when horizontally centered) – Error = ball_radius – TARGET_BALL_RADIUS – Positive error (too close): back up – Negative error (too far): move forward – If within BALL_RADIUS_TOLERANCE: stop (“LOCKED”) |
Figure 3 – Ball tracking image from camera (radius is 29)
Lost Ball Recovery
If the target ball disappears from the camera frame, a lost counter increments each frame. If the ball reappears within approximately one second (30 frames), the robot holds position and re-acquires. After one second of lost contact, the tracker returns to the search phase and begins rotating to re-locate the ball.
Tuning Parameters
| Parameter | Default | Purpose |
| TARGET_BALL_RADIUS | 50 px | Expected ball radius at desired follow distance (~2 ft) |
| BALL_RADIUS_TOLERANCE | 10 px | Deadband around target radius before driving |
| CENTER_TOLERANCE | 30 px | Horizontal centering deadband |
| TRACK_SPEED_FACTOR | 0.003 | Motor speed per pixel of horizontal error |
| SEARCH_ROTATE_SPEED | 0.3 | Motor speed during search rotation |
HTTP Camera Streaming
The camera feed is served as a Motion JPEG (MJPEG) stream over HTTP. Any web browser or video player that supports MJPEG can display the feed.
| Property | Value |
| Server Address | http://<IP>:8080 |
| Stream URL | http://<IP>:8080/stream |
| Format | Motion JPEG (MJPEG) |
| Resolution | 640 × 480 |
| JPEG Quality | 70% |
| Frame Rate | ~15–20 fps |
When ball tracking is active, the stream includes a visual overlay: target color label in the top-left corner, a yellow circle drawn around the detected ball, the ball’s radius in pixels, and a white crosshair at the frame center.
File Structure and Service Management
File Layout
| /home/jetson/ ├── jetbot_tracker.py # Main control script ├── jetbot_unified.py # Manual-only version (no tracking) └── NO_AUTOSTART # Create this file to bypass auto-start /etc/systemd/system └── jetbot-tracker.service # systemd auto-start unit |
Service Commands
| # Start / stop manually sudo systemctl start jetbot-tracker sudo systemctl stop jetbot-tracker # Enable / disable auto-start on boot sudo systemctl enable jetbot-tracker sudo systemctl disable jetbot-tracker # View live logs journalctl -u jetbot-tracker -f # Temporary bypass (create file, remove to re-enable) touch ~/NO_AUTOSTART |
Component Status Summary
Current status of all JetBot hardware and software components as of the most recent testing session:
| Component | Status |
| Drive motors (left/right) | ✓ Working |
| Camera lift + limit switches | ✓ Working |
| RGB LEDs | ✓ Working |
| OLED display | ✓ Working |
| USB camera streaming | ✓ Working |
| PWM servos (pan/tilt) | ✓ Working |
| Logitech F710 controller | ✓ Working |
| K1 shutdown button | ✓ Working |
| Ball tracking (R/G/B) | ✓ Working |
| Battery monitor (INA219) | ✓ Working (Bus 0, 0x41) |
| Auto-start service | ✓ Working |
Troubleshooting
| Issue | Solution |
| Port 8080 already in use | Run: sudo fuser -k 8080/tcp |
| Camera not found | Check USB connection; run: ls /dev/video* |
| Service keeps restarting | Stop service: sudo systemctl stop jetbot-tracker |
| Ball not detected | Adjust HSV color ranges in script; check lighting conditions |
| Robot oscillates during tracking | Increase CENTER_TOLERANCE or BALL_RADIUS_TOLERANCE |
| Servos do not move | Check PCA9685 frequency; may conflict if set to non-50 Hz |
| Battery voltage not displayed | Verify INA219 is on Bus 0 at address 0x41 |
Project Background
The Yahboom JetBot is a tracked robot kit built around the NVIDIA Jetson Nano 4GB single-board computer with a custom expansion board. The manufacturer supplies a pre-built SD card image that includes drivers, demo code, and a Jupyter notebook interface.
Unfortunately, the supplied image—both on the included USB drive and downloaded from Yahboom’s website—failed to boot reliably. The image dates from approximately 2020 and appears to suffer from a combination of flash storage degradation, SD card compatibility issues with the Jetson Nano, and outdated JetPack dependencies.
Rather than continue troubleshooting the manufacturer’s image, the decision was made to start fresh with Qengineering’s Ubuntu 20.04 image for the Jetson Nano and rebuild all robot functionality from scratch. Every hardware interface—motor channels, servo mappings, I2C addresses, GPIO pin assignments, and limit switch logic—was reverse-engineered by examining Yahboom’s original Python notebooks and testing directly against the expansion board.
The result is jetbot_tracker.py: a single self-contained Python script that provides full manual control and autonomous ball tracking without requiring ROS, Jupyter, or any of the manufacturer’s software stack.
Terminal Commands
This section lists most of the terminal commands used.
Introduction
This document catalogues the primary terminal commands used during the development of the JetBot Tracker project. Commands are organized by function: from initial OS installation and system setup, through hardware discovery and dependency installation, to script development, testing, and deployment as a system service.
All commands were executed on an NVIDIA Jetson Nano 4GB running Qengineering’s Ubuntu 20.04 image, accessed either via a directly connected monitor or over SSH from a development PC on the same network.
1. OS Installation and Initial Setup
The project began with flashing a fresh Ubuntu 20.04 image to a microSD card after the manufacturer’s image failed to boot. These commands cover the initial system configuration performed immediately after first boot.
| Command | Description | Context |
| sudo dd if=/dev/zero of=/dev/sdX bs=1M count=100 | Wipe the first 100 MB of the SD card to clear old partition tables before flashing a new image | Run on host PC |
| sudo apt update | Refresh the package index from all configured repositories | First command after boot |
| sudo apt upgrade | Install all available package updates to bring the system current | Immediately after apt update |
| hostname -I | Display the Jetson Nano’s IP address for SSH access | On the Nano terminal |
| ip addr show wlan0 | Show detailed network information for the WiFi interface, including the assigned IP address | Alternative to hostname -I |
| ssh jetson@192.168.1.xxx | Connect to the Jetson Nano from a remote PC over SSH | From development PC |
| ifconfig | Display all network interfaces and their IP addresses | Network troubleshooting |
| sudo nmcli device wifi connect “SSID” password “PASSWORD” | Connect the Nano to a WiFi network by name and password | Initial WiFi setup |
2. I2C and Hardware Discovery
The expansion board’s hardware interfaces were not documented in a usable form. These commands were used to discover I2C device addresses, identify the PCA9685 PWM controller, locate motor channels, find limit switches, and map servo configurations.
| Command | Description | Context |
| sudo apt install -y i2c-tools | Install I2C diagnostic utilities including i2cdetect, i2cget, and i2cset | One-time setup |
| sudo apt install -y python3-smbus | Install the Python SMBus library for I2C communication from scripts | One-time setup |
| sudo i2cdetect -y -r 1 | Scan I2C Bus 1 and display a grid of all responding device addresses (found 0x40, 0x1B, 0x70) | Hardware discovery |
| sudo i2cdetect -y 0 | Scan I2C Bus 0; used later to find the OLED (0x3C) and INA219 battery monitor (0x41) | Bus 0 devices |
| ls /dev/input/js* | Check if the Logitech F710 gamepad is recognized as a joystick device | Controller setup |
| ls /dev/video* | List available video devices to identify the USB camera device node (found /dev/video1) | Camera setup |
| python3 pca9685_diag.py | Run a custom diagnostic script that tests all 16 PCA9685 channels at 50% duty cycle, one at a time, to identify motor channel assignments | Channel discovery |
| python3 lift_motor_scan.py | Test non-motor PCA9685 channels (0–7, 12–15) to locate the camera lift motor (found Ch 12–13) | Lift motor discovery |
| sudo python3 limit_switch_test.py | Monitor GPIO pins 11 and 12 in real time to verify limit switch behavior as the camera lift is manually moved | GPIO pin mapping |
| python3 test_dpad.py | Read raw joystick events from /dev/input/js0 to determine D-pad axis numbers and value ranges | Controller mapping |
3. Python Dependencies and Package Installation
The JetBot script depends on several Python libraries for I2C communication, PWM control, GPIO access, image processing, and display output. The Jetson Nano’s ARM architecture required specific package versions in many cases.
| Command | Description | Context |
| sudo apt install python3-pip | Install the Python 3 package manager | Prerequisites |
| sudo apt install python3-dev | Install Python 3 development headers needed for compiling C extensions | Prerequisites |
| sudo apt install build-essential | Install the GCC compiler toolchain required for building native Python packages | Prerequisites |
| sudo pip3 install adafruit- circuitpython-pca9685 | Install the Adafruit PCA9685 driver library for PWM motor and servo control via I2C | Motor/servo control |
| sudo pip3 install adafruit-circuitpython- motor | Install the Adafruit motor helper library for simplified DC motor control | Motor control |
| sudo pip3 install Jetson.GPIO | Install NVIDIA’s GPIO library for Jetson Nano pin access (limit switches, shutdown button) | GPIO access |
| sudo apt install python3-opencv | Install OpenCV for Python; used for camera capture, HSV color filtering, and ball detection | Computer vision |
| sudo pip3 install numpy | Install NumPy for array operations used by OpenCV image processing | Vision support |
| sudo pip3 install Pillow | Install the PIL imaging library for generating text and graphics on the OLED display | OLED display |
| sudo pip3 install adafruit-circuitpython- ssd1306 | Install the SSD1306 OLED driver for the 128×32 monochrome display on I2C Bus 0 | OLED display |
| sudo pip3 install pyserial | Install serial port library; resolved a missing dependency for the original jetbot module | Dependency fix |
| sudo pip3 install Cython | Install Cython compiler; required as a build dependency for several packages including h5py | Build dependency |
| sudo apt install libhdf5-dev libhdf5-serial-dev | Install HDF5 system libraries required for building h5py from source on ARM | Build dependency |
| pip3 list | grep package_name | Verify a specific package is installed and check its version number | Troubleshooting |
| sudo pip3 install –upgrade pip | Update pip itself to the latest version to resolve dependency resolution issues | Maintenance |
4. Script Development and Editing
All script development was done directly on the Jetson Nano using the nano text editor over SSH. Scripts were tested interactively before being deployed as system services.
| Command | Description | Context |
| nano ~/jetbot_tracker.py | Open the main control script in the nano text editor for editing; Ctrl+O to save, Ctrl+X to exit | Primary editing tool |
| nano ~/jetbot_unified.py | Edit the manual-only version of the control script (no ball tracking) | Alternate script |
| python3 ~/jetbot_tracker.py | Run the tracker script interactively for testing; Ctrl+C to stop | Development testing |
| cat > ~/test_script.py << ‘EOF’ … script content … EOF | Create a small test script using heredoc syntax; used frequently for quick diagnostic scripts | Quick test scripts |
| chmod +x ~/script_name.py | Make a Python script executable so it can be run with ./script_name.py | Permissions |
| Ctrl+W (in nano) | Search within the nano editor; used to jump to specific sections like controller mapping or tuning parameters | In-editor navigation |
5. Process and Port Management
During iterative development, the HTTP camera stream on port 8080 frequently needed to be released before restarting the script. These commands became the standard pre-launch sequence.
| Command | Description | Context |
| sudo fuser -k 8080/tcp | Kill any process holding port 8080 (the camera stream); essential before restarting the script | Before each test run |
| sleep 1 | Pause briefly after killing a port to let the OS fully release the TCP socket | Used with fuser |
| pkill -9 python3 | Force-kill all running Python 3 processes; used when the script becomes unresponsive | Emergency stop |
| ps aux | grep python | List all running Python processes to check if old instances are still lingering | Diagnostics |
6. systemd Service Management
Once the script was stable, it was deployed as a systemd service so it would start automatically on boot. A bypass mechanism was added so a monitor could be connected for maintenance without the script grabbing the camera and ports.
| Command | Description | Context |
| sudo nano /etc/systemd/system/ jetbot-tracker.service | Create or edit the systemd unit file that defines the auto-start service | Service setup |
| sudo systemctl daemon-reload | Tell systemd to re-read all unit files after creating or editing a service definition | After editing .service |
| sudo systemctl enable jetbot-tracker | Enable the service to start automatically at boot | Deployment |
| sudo systemctl disable jetbot-tracker | Prevent the service from starting at boot | Maintenance |
| sudo systemctl start jetbot-tracker | Start the service immediately without rebooting | Manual start |
| sudo systemctl stop jetbot-tracker | Stop the running service; essential before editing the script or running interactively | Before editing |
| sudo systemctl status jetbot-tracker | Check whether the service is running, and show recent log output | Diagnostics |
| journalctl -u jetbot-tracker -f | Follow the service’s log output in real time; shows print() output and errors | Live debugging |
| journalctl -b | Show all log messages from the current boot session | Boot diagnostics |
| systemd-analyze blame | grep jetbot | Show how long the jetbot service took to start during boot | Performance check |
| touch ~/NO_AUTOSTART | Create the bypass file that prevents the service from launching the script on next boot | Maintenance mode |
| rm ~/NO_AUTOSTART | Remove the bypass file to re-enable auto-start | Resume normal mode |
7. System Shutdown and Power Management
Proper shutdown is important on the Jetson Nano to prevent SD card corruption. These commands were used for clean shutdowns before switching to battery power.
| Command | Description | Context |
| sudo systemctl stop jetbot-tracker | Stop the control script to release the camera, ports, and GPIO cleanly | Before shutdown |
| pkill -9 python3 | Ensure no Python processes remain holding hardware resources | Before shutdown |
| sync | Flush all pending filesystem writes to the SD card | Before shutdown |
| sudo shutdown -h now | Perform a clean system shutdown; safe to remove power after the green LED stops blinking | Power off |
| sudo reboot | Restart the system; used after editing the systemd service or changing configuration files | Configuration changes |
8. Network and Remote Access
The Jetson Nano was primarily accessed over SSH from a development PC. The camera stream was viewed in a web browser on the same network.
| Command | Description | Context |
| ssh jetson@192.168.1.164 | Connect to the Nano over SSH using its static IP address | Primary access method |
| hostname -I | Quickly display the Nano’s current IP address | Verify IP |
| nmcli device status | Show the status of all network interfaces (WiFi connected, Ethernet active, etc.) | Network diagnostics |
| iwconfig | Display WiFi interface details including signal strength and connected network name | WiFi diagnostics |
| http://192.168.1.164:8080 | URL to view the live camera stream in any web browser on the same network | Opened in browser |
9. Common Troubleshooting Commands
These commands were used repeatedly during development to diagnose hardware issues, resolve port conflicts, and verify that components were functioning correctly.
| Command | Description | Context |
| sudo i2cdetect -y -r 1 | Re-scan I2C bus to verify devices are still responding after a power cycle or wiring change | Hardware check |
| ls /dev/video* | Verify the USB camera is detected; if /dev/video1 disappears, the camera has disconnected | Camera check |
| ls /dev/input/js* | Verify the Logitech gamepad wireless dongle is connected and recognized | Controller check |
| sudo fuser -k 8080/tcp | Release port 8080 when getting “Address already in use” errors | Port conflict |
| dmesg | tail -20 | Show the most recent kernel messages; useful for diagnosing USB device connection issues | Hardware errors |
| dmesg | grep -i usb | Filter kernel messages for USB-related events to debug camera or controller detection | USB diagnostics |
| lsusb | List all connected USB devices to verify the camera and gamepad dongle are present | USB device check |
| pip3 list | grep adafruit | Verify Adafruit libraries are installed and check version numbers | Package check |
| python3 -c “import cv2; print(cv2.__version__)” | Quick check that OpenCV is installed and importable | Package check |
10. Repository and File Management
The manufacturer’s original code repository was cloned early in the project to study the Yahboom JetBot’s hardware mappings and original control logic.
| Command | Description | Context |
| git clone https://github.com/ YahboomTechnology/ JetBot-AI-Robot-Car.git | Clone the Yahboom JetBot repository to study their original motor mappings, servo code, and notebook examples | Reference code |
| ls ~/JetBot-AI-Robot-Car/ | List the cloned repository contents including manuals, code samples, and hardware documentation | Browsing reference |
| cat ~/jetbot_tracker.py | Display the entire script in the terminal for review or to copy into another tool | Code review |
| cp ~/jetbot_unified.py ~/jetbot_unified_backup.py | Create a backup of the script before making major changes | Version safety |
